Installing the Deck
 After the
hull is glassed, the shear clamps need to be planed to match the contour
of the deck. I made some radius gauges with the proper curvature (48 inch
radius aft and 16 inch radius forward) out of manila paper. Using these
gauges, I planed the proper angle on to the shear clamps. Between the cockpit
deckbeam and the aft bulkhead, the radius makes a transition from 16 inches
to 48 inches, so I took a guess at the proper angles. Next, I trial fitted
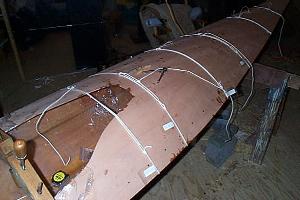
the deck by lashing it to the hull with sash cord. At this point, the planed
angles can be checked. The underside of the deck must meet the outside
of the hull. If too little angle was planed on the shear clamps, a gap
can be seen. Since epoxy is such a good filler,(and performs well with
thick glue joints)I decided that the angle tolerance should always be on
the minus side. This way, (in theory) I will not have to fill any gaps
at the shear. Next, I removed all of the trial fitted plywood. I applied
clear epoxy to the underside of the aft deck. Next, epoxy thickened with
cab-o-sil was applied to the tops of the shear clamps, bulkheads, and deckbeams.
Then I re-tied the aft deck using the sash cords and began nailing the
bronze ring nails through the plywood into the shear clamp, starting at
the aft bulkhead and working aft. Next, the same process was applied to
the foredeck, nailing from the cockpit deckbeam forward. Finally, the area
between cockpit deckbeam and aft bulkhead was nailed.
 Where the
foredeck meets the aft deck, a butt joint is made. I trimmed the foredeck
plywood to length with several passes of a razor knife. The butt joint
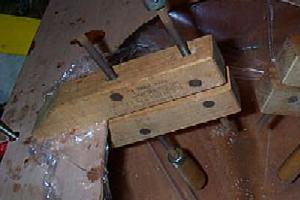
was backed up and glued to a small (1 inch wide) piece of plywood, covered
in plastic wrap, and clamped.
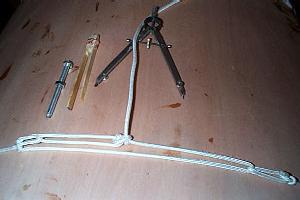
 Here
are some tools that I used to attach the deck: A compass to mark off the
distance between nails, a bolt with the end ground to use as a nail set,
a nailing gauge made from popsicle sticks, and the sash cords. The popsicle
stick gauge is needed because the deck is supplied oversized and will be
trimmed later. But the nails need to be even in relation to the side of
the boat. The gauge has one short stick that touches the side of the hull,
while the longer marks the spot 1/2 inch in where the nail belongs. The
sash cords are rigged in a cascade arrangement similar to that used by
Laser sailors to increase purchase on the vang or cunningham. A bowline
is tied at the end, and placed at one shear. The cord is passed under the
boat, and another bowline tied near the other shear. The tail of the second
bowline is reeved through the first bowline, then through the second bowline,
then tied off with a tautline hitch for adjustability.
 After the
hull is glassed, the shear clamps need to be planed to match the contour
of the deck. I made some radius gauges with the proper curvature (48 inch
radius aft and 16 inch radius forward) out of manila paper. Using these
gauges, I planed the proper angle on to the shear clamps. Between the cockpit
deckbeam and the aft bulkhead, the radius makes a transition from 16 inches
to 48 inches, so I took a guess at the proper angles. Next, I trial fitted
the deck by lashing it to the hull with sash cord. At this point, the planed
angles can be checked. The underside of the deck must meet the outside
of the hull. If too little angle was planed on the shear clamps, a gap
can be seen. Since epoxy is such a good filler,(and performs well with
thick glue joints)I decided that the angle tolerance should always be on
the minus side. This way, (in theory) I will not have to fill any gaps
at the shear. Next, I removed all of the trial fitted plywood. I applied
clear epoxy to the underside of the aft deck. Next, epoxy thickened with
cab-o-sil was applied to the tops of the shear clamps, bulkheads, and deckbeams.
Then I re-tied the aft deck using the sash cords and began nailing the
bronze ring nails through the plywood into the shear clamp, starting at
the aft bulkhead and working aft. Next, the same process was applied to
the foredeck, nailing from the cockpit deckbeam forward. Finally, the area
between cockpit deckbeam and aft bulkhead was nailed.
 Where the
foredeck meets the aft deck, a butt joint is made. I trimmed the foredeck
plywood to length with several passes of a razor knife. The butt joint
was backed up and glued to a small (1 inch wide) piece of plywood, covered
in plastic wrap, and clamped.
 Here
are some tools that I used to attach the deck: A compass to mark off the
distance between nails, a bolt with the end ground to use as a nail set,
a nailing gauge made from popsicle sticks, and the sash cords. The popsicle
stick gauge is needed because the deck is supplied oversized and will be
trimmed later. But the nails need to be even in relation to the side of
the boat. The gauge has one short stick that touches the side of the hull,
while the longer marks the spot 1/2 inch in where the nail belongs. The
sash cords are rigged in a cascade arrangement similar to that used by
Laser sailors to increase purchase on the vang or cunningham. A bowline
is tied at the end, and placed at one shear. The cord is passed under the
boat, and another bowline tied near the other shear. The tail of the second
bowline is reeved through the first bowline, then through the second bowline,
then tied off with a tautline hitch for adjustability.