Where do you start? How do you design a good performing kayak? I was guided mainly by two things: The anthropometric dimensioning system used by the Inuit people, and the characteristics of existing "good" designs.
I read the books. I read posts on the Greenland Techniques Forum. I surveyed data from existing boat designs. I filled a pretty think notebook with all of this stuff.
I downloaded some computer design tools. Some are free, others must be paid for. Many have a "trial" or "shareware" version. Some are great, some are horrible.
I dusted off my drafting table. I don't use CAD.
Below, I'll show how some of the design decisions were made. I'm sure that some people will think that the finished product will look just like some other designs out there,but that's just the nature of the beast. I want ensure that my design is unique, to avoid having to say something like "oh, crap... I just designed a North Bay..". Also, I'm looking at this as a learning experience, and hopefully, the boat will turn out right.
The basics:
A quick, informal survey shows that my kayak will be longer, narrower,
and lower than what I have been paddling. There. Was that so hard?
The length should be about 3 armspans. Let's say 18 feet, plus or minus.
A popular rule of thumb for the beam is the width of the hips, plus the width of two fists. But some kayaks are built as narrow as the width of hips plus two fingers. For me, hips plus two fists equals about 21.5 inches, and I chose a compromise of about 20 inches. This is narrower than most commercial boats, and not as narrow as some traditional craft.
The Sheer:
The graceful curve where the sides meet the deck on a skin-on-frame
boat is created by two elements. First, the gunwhales while being assembled
are torqued to an angle of about 17 degrees from vertical. This results
in about 3.5 inches of sheer. Next, the stem and stern pieces are shaped
to the builder's liking, which can create some extra sheer right in the
ends of the boat. I chose to give my boat this same shape of sheerline,
with a gentle curve in the middle of the boat, and some extra in the ends.
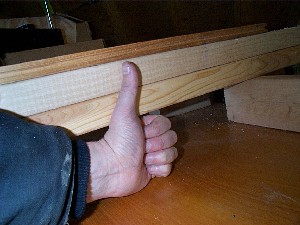
The rule of thumb for the deck height is just that: the height
of your thumb...extended from the fist. Like the well-known hand signal
used by hitchhikers. The coaming starts at this height. Here is where I
will run into trouble. In a skin boat, the paddler can gain toe room by
avoiding the placement of a rib where the heels are. The toes and heels
can create little bumps in the skin if need be. But I am designing in wood,
so I must take care to leave enough room for toes. I have decided on a
compromise. I will raise the height of the deck by about an inch, then
attempt to recess the coaming to get the total coaming height back down
where it would normally be. Then, I will design the deck camber to suit
the toe room requirement. I have decided on a sheer height of about 7 inches,
measured aft of the paddler. This is still very low compared to most sea
kayaks.

Position and height of the Masik
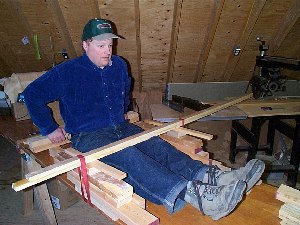
When designing a low-volume kayak, one must take care to ensure that the paddler can get in and out. I built up some wood pieces to simulate the rear of the coaming. (See picture above) Here is some wood, stacked up to the height of the deck, (height of the hitch-hiker thumb) plus some extra for the coaming. This is the height of the paddler's derriere when entering the kayak. The trick is to determine the lowest height that the kneecaps will clear while the paddler is entering the kayak. I built this temporary contraption to help determine the answer for me. And answer is, it's lower than you think.

This pile of scrap wood strapped and screwed together is also giving
me the proper dimensions for position of the isserfik (takes the place
of the backband) and the masik (the fore-deckbeam and knee brace). Actually,
that "masik" is going to be the shaft for my next laminated Greenland paddle
shaft. How low can you get the masik, and still get in? Pretty low. Much
lower than I had imagined. Low enough for me to start worrying about toe
room.
All of the Skin-on Frame boatbuilding texts give methods to determine the fore and aft position of the paddler. I wonder which is right?
With all of these basic dimensions, I began playing around with the various software written for boat design. Simultaneously, I began to draw the boat the old-fashioned way, with pencil on vellum. I used the computer programs to obtain some hydrostatic data, and a few points for the developed plates.
I ended up with 3 drawings: A kayak drawing at a scale of 1.5 inces to the foot, a drawing of the forms at full scale, and a drawing of the bottom and side plates with offset tables for each. This last drawing will most likely receive the most revision. I had to interpolate the points quite a bit, so when the boat is built, I will have to make changes to the offset table to produce fairness in the hull. For this reason, I plan to use multiple forms on a strongback, and modify the plates during assembly.
Well, it's time to sharpen my planes and find my epoxy-encrusted sneakers!