
How to Tune a Tesla Coil:
You CAN tune a Tesla Coil but you CAN'T ...
|
 |
This was created and posted 29 January 2006. Corrections or comments encouraged. Thank you.
Step 1: Gather the Equipment
Need 4 Items:
- Two Resistors, 50 to 100 ohm for tuning the primary and around a 10K-20Kohm resistor for tuning the secondary.
- Osilloscope, general purpose up to about a MHz is ok but must have a constant amplitude response throughout the frequency band between 10KHz through 500KHz or so.
- Signal Generator (that covers 10KHz to 1MHz). The signal generator must also produce a constant output over the frequency range of the coil you are trying to tune. Must have a low impedance (50 Ohm) ouput too.
Step 2: Understand the Procedure
Procedure Overview:
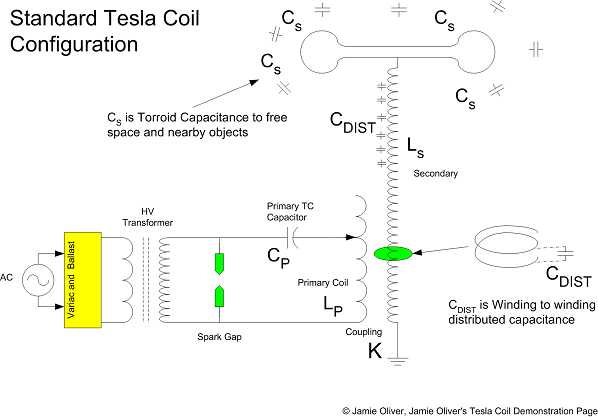
The definition of a Tesla Coil is a double tuned resonant transformer. This means that the primary is tuned and the seconary is also tuned and they both must be tuned to the same frequency. Since the secondary is NOT easily tuned, we find out where it resonates and then make the primary resonate at the same frequency as the secondary.
I don't want to go into big explanations about resonance but you should study that first. If you have not had much electronics theory, please get the ARRL publication (www.arrl.org) "Amateur Radio Handbook." Even a 30 year old version from your local library will have a great write up on resonance and the basics of inductors and capacitors. It is relatively easy reading for those without a technical background.
| The equation at the right is the equation for determining the frequency of resonance. The equation applies for the primary inductor and capacitor and also applies for the secondary inductor and |
capacitor as well. If the frequency is to remain fixed in a design and you want to increase one of the components (inductor or capacitor), you will need to decrease the other.
What is the secondary capacitance?
The secondary capacitance is made up of the capacitance from the torroid (C-s) and the distributed capacitance in the winding of the secondary. See the drawing below. Since there are typically so many windings on the secondary, there is alot of interwinding distributed capacitance (C-dist) which is additive to the equivalent capacitance for the overall resonance point. Since the primary is only a handfull of turns, the predominant capacitance is the primary capacitor on the primary side.
Why should you tune it this way compared to the old trial and error way?
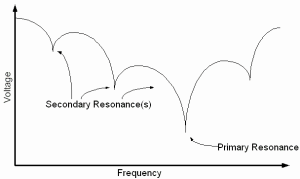
If all the components in a tesla coil were ideal components, the resonant point would be like the curve at the right. However, a secondary coil is not so ideal. It has winding to winding capacitance with resistance at every winding and it ends up being a pretty wild equivalent circuit. It may be possible to model but it's over my head and too much work and I really don't care. I much prefer taking the easy way out plan and just sweeping the band with an analog signal generator described below. |
|
If someone is to try to tune a coil the conventional way by moving the tap on the primary a little bit at a time, you could find an improvement in the coil and then continue to tune away from it and it will get worse. Then you will go back and think you found the perfect spot because it got better. But it still isn't great and you wonder why the coil isn't performing well. Well, you could have tuned your coil to one of many secondary resonant points. |
If you follow the really easy tuning procedure below, you will see all the secondary resonant points and can know exactly where the primary resonant frequency is! No trial and error, no frustration, and no guessing.
Step 3: Isolate the Secondary and Find the Resonant Frequency of the Secondary and Torroid.
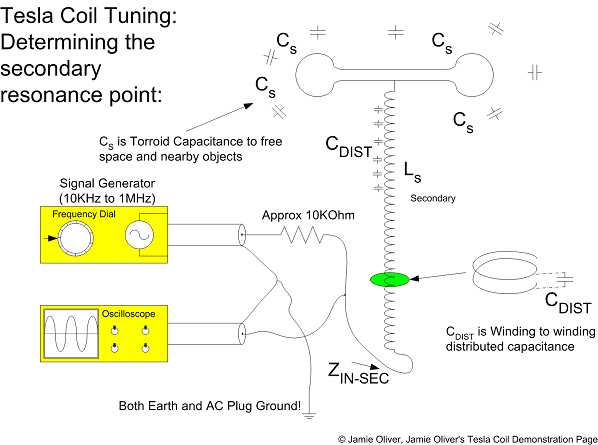
The circuit below by itself may seem like there is no way that this will work as it is an open ended circuit and no visible return path so how could it possibly work. Well, after you try it you will have a better feel for what a free space capacitor can be. First, you must isolate the secondary so there is nothing around that would upset the natural resonance including you! To do this test you should be at least 2 meters away from the secondary as you are a bag of water to the secondary.
If you have the primary of your coil attached, disconnect all the connections to the primary coil and cap. Remove all potential hardware that would upset the field around the secondary. The procedure is to use a signal generator to sweep the spectrum for a resonance point. At the resonance point, the input impedance to the base of the secondary will drop significantly. This is the point that you are looking for. Connect the circuit as shown below. The value of the resistor is important. It should be close to 10K but I wouldn't go lower. Maybe up to 20Kohms. Turn up the signal generator to get a good large signal sine wave. Set the scope up so that you get a full screen deflection at a relatively low sweep rate such that you are just monitoring the peak-to-peak amplitude. Sweep the signal generator until you get a very prominant dip at the connection that connects to the base of the coil. Mark or measure this frequency point. This is the secondary natural resonant frequency.
Now, DON'T touch the signal generator.
Caution: do this sweep carefully and spend some time looking at the secondary resonant points. Make sure that you find the primary resonant point and not one of the secondary resonant points.
Step 4: Remove the Secondary and Make the Primary Resonant at the Same Frequency as the Secondary
Now that you found the resonant point of the secondary, you need to make the primary circuit resonant at the same frequency. Remove the secondary away from the primary tank circuit. Change the cicuit and use a lower impedance resistor, 100 ohms. Simply move the tap on your primary coil along your primary and look at the scope for a dip. The best operational point will be where you get the dip on the scope. (It has been a loooong time since I did this and I may have mis-spoken dip/peak but I think I got it right). Once you get your dip, mark it. Your connection should be very solid as your primary current will be limited by this connection. Your tesla coil is tuned.
Step 5: Power Check
Adjustment:
Once I set the tuning point on the primary, I fired up the coil. I thought it would be close but I'd have to tune it closer. It was right on and I was not able to improve the tuning point. It was perfect under full power.
© Copyright 2006-2017. Jamie Oliver - Contents of this page are the sole responsibility of me, Jamie Oliver, and no, I'm not the British "Jamie Oliver, The Naked Chef" but I'd enjoy meeting him some day.
|
|


